
Garage door sensors are essential for the safe and efficient operation of your garage door system. These sensors detect obstructions in the door’s path, preventing potential accidents or property damage. However, over time, sensors can become misaligned, leading to garage door malfunctions or complete operational failures. Misaligned sensors can cause your door to not close properly, reverse unexpectedly, or fail to open at all, creating inconvenience and safety risks. To ensure your garage door operates smoothly and reliably, it is crucial to align the sensors correctly.
In this comprehensive guide, we’ll provide a step-by-step approach to align your garage door sensors. By following these steps, you can restore the proper functioning of your garage door, enhance safety, and prevent future issues. We’ll cover everything from identifying misalignment signs to adjusting the sensors and testing the alignment. Whether you’re a DIY enthusiast or a homeowner looking to maintain your garage door system, this guide will help you achieve optimal sensor performance for smooth and hassle-free garage door operation.
Understanding the Importance of Aligning Garage Door Sensors
Properly aligned garage door sensors are essential for several reasons:
- Safety
Misaligned sensors can fail to detect objects or people in the door’s path, leading to potential accidents or injuries. Properly aligned sensors ensure that the door stops and reverses its motion when an obstruction is detected, preventing harm.
- Functionality
Misaligned sensors can cause the new garage door to malfunction, preventing it from opening or closing correctly. This can be inconvenient and frustrating, especially when you’re in a hurry or dealing with inclement weather.
- Energy Efficiency
If the garage door fails to close properly due to misaligned sensors, it can lead to energy loss, increased utility bills, and potentially compromise the security of your home or property.
Safety Considerations When Aligning Garage Door Sensors
Before you begin the alignment process, it’s essential to prioritize safety. Here are some important safety considerations:
Disconnect the Power Source
Always disconnect the power source to your garage door opener before attempting any maintenance or adjustments. This will prevent the door from accidentally moving during the alignment process.
Secure the Garage Door
If possible, secure the garage door in the open position using a sturdy prop or support. This will prevent the door from falling unexpectedly and causing potential injury or damage.
Wear Appropriate Protective Gear
Consider wearing protective gloves and eye protection to safeguard yourself from any potential hazards during the alignment process.
Exercise Caution
Be mindful of your surroundings and avoid placing your hands or body in areas where they could be pinched or trapped by the moving parts of the garage door system.
Five Step-by-Step Guide on How to Align Garage Door Sensors
Step 1: Identify the Type of Garage Door Sensors You Have
Before you begin the alignment process, it’s essential to identify the type of garage door sensors installed in your system. There are two main types of sensors:
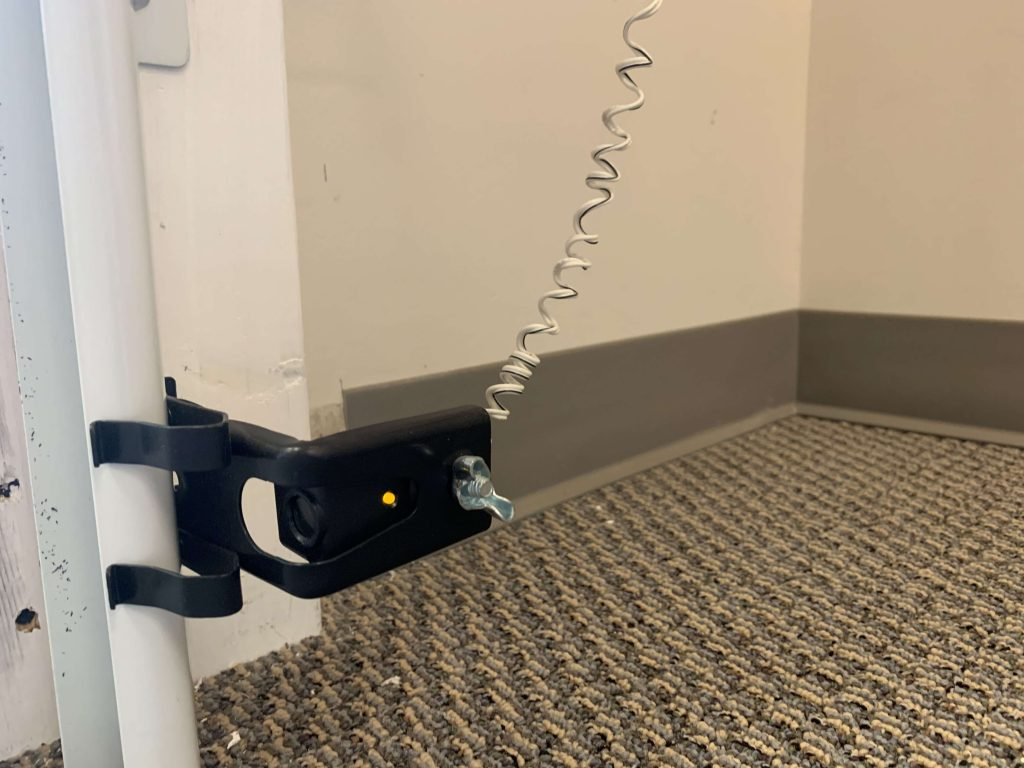
- Photoelectric Sensors: These sensors use a beam of light to detect obstructions. They consist of a sending unit (with a light source) and a receiving unit (with a light sensor). When the beam of light is interrupted, the sensor signals the garage door to stop or reverse its motion.
- Laser Sensors: These sensors utilize laser technology to detect obstructions. They typically consist of a single unit that emits a laser beam and detects its reflection. When the reflection is interrupted, the sensor signals the garage door to stop or reverse its motion.
Step 2: Prepare the Necessary Tools for Alignment
Before you begin the alignment process, gather the following tools:
- Ladder (if needed to access the sensors)
- Level (to ensure proper sensor alignment)
- Screwdrivers (flat-head and Phillips-head, depending on your sensor mounting)
- Wrench (if your sensor mounting requires adjustment)
- Cleaning supplies (soft cloth, mild detergent, and water)
Step 3: Check for Any Obstructions or Dirt on the Sensors
Obstructions or dirt on the sensors can interfere with their proper functioning and alignment. Before proceeding with the alignment process, perform the following steps:
- Visual Inspection: Carefully inspect the sensors for any visible obstructions, such as cobwebs, insect nests, or debris. Remove any obstructions gently using a soft brush or cloth.
- Clean the Sensors: Use a soft cloth dampened with mild detergent and water to gently clean the sensor lenses or surfaces. Avoid using abrasive cleaners or materials that could scratch or damage the sensors.
- Check for Alignment Obstructions: Ensure that there are no objects or structures in the direct line of sight between the sending and receiving units of the sensors. Any obstructions in this path can prevent proper alignment and functioning.
Step 4: Adjust the Sensors Manually
Once you’ve identified the type of sensors and prepared the necessary tools, it’s time to adjust the sensors manually. Follow these steps:
- Loosen the Sensor Mounting: Using the appropriate screwdriver or wrench, carefully loosen the mounting hardware that secures the sensors to their respective positions. Be cautious not to overtighten or strip the hardware.
- Adjust the Sensor Angle: Gently adjust the angle of the sensors until they are directly facing each other. For photoelectric sensors, ensure that the sending unit is aligned with the receiving unit. For laser sensors, adjust the single unit until it is level and facing the desired direction.
- Use a Level: Place a level on top of the sensor or its mounting bracket to ensure it is perfectly level. Adjust the sensor’s position until the level indicates a horizontal alignment.
- Tighten the Mounting Hardware: Once the sensors are properly aligned, securely tighten the mounting hardware to prevent any future misalignment.
Step 5: Test the Alignment and Functionality of the Sensors
After manually adjusting the sensors, it’s crucial to test their alignment and functionality to ensure they are operating correctly. Follow these steps:
- Reconnect the Power Source: Reconnect the power source to your garage door opener, following the manufacturer’s instructions.
- Activate the Garage Door: Attempt to close the garage door using the wall-mounted control or remote control.
- Obstruction Test: Place a solid object (such as a piece of wood or a cardboard box) in the path of the sensor beam while the door is closing. The door should stop and reverse its motion upon detecting the obstruction.
- Alignment Test: If the door fails to stop or reverse when an obstruction is present, it may indicate that the sensors are still misaligned. Repeat the adjustment process until the sensors function correctly.
- Final Check: Once the sensors are properly aligned and functioning, perform a few open and close cycles to ensure consistent operation.
Troubleshooting Common Issues During Sensor Alignment
Despite your best efforts, you may encounter some common issues during the sensor alignment process. Here are a few troubleshooting tips:
- Sensor Wiring
If the sensors are still not functioning correctly after alignment, check the wiring connections between the sensors and the garage door opener. Ensure that the wires are securely connected and free from any damage or fraying.
- Sensor Placement
Verify that the sensors are placed at the correct height and distance from the ground, as recommended by the manufacturer. Improper placement can affect their ability to detect obstructions accurately.
- Sensor Lenses
Inspect the sensor lenses for any cracks, scratches, or damage that could interfere with their operation. If necessary, replace the damaged sensors with new ones.
- Interference
Ensure that there are no sources of interference, such as strong sunlight or other electronic devices, that could disrupt the sensor signal.
- Professional Assistance
If you’ve exhausted all troubleshooting efforts and the sensors still fail to align or function properly, consider seeking professional assistance from a qualified garage door technician.
Regular Maintenance Tips for Garage Door Sensors
To ensure the long-term reliability and proper functioning of your garage door sensors, it’s essential to perform regular maintenance. Here are some tips to keep in mind:
- Visual Inspection
Periodically inspect the sensors for any obstructions, dirt, or debris that may have accumulated. Clean the sensors as needed using a soft cloth and mild detergent.
- Alignment Check
Check the alignment of the sensors every few months, especially if you notice any issues with the garage door’s operation. Adjust the sensors as necessary to maintain proper alignment.
- Sensor Testing
Regularly test the functionality of the sensors by placing an obstruction in their path while the door is closing. The door should stop and reverse its motion upon detecting the obstruction.
- Wiring Inspection
Inspect the wiring connections between the sensors and the garage door opener for any signs of damage or looseness. Tighten or replace the wiring as needed.
- Manufacturer Recommendations
Consult your garage door system’s manufacturer for any specific maintenance recommendations or guidelines related to the sensors.
FAQs
How do I realign my garage door sensors?
To realign your garage door sensors, clean the sensor lenses, ensure they are mounted at the same height on each side of the door, and adjust them until the indicator lights show they are properly aligned.
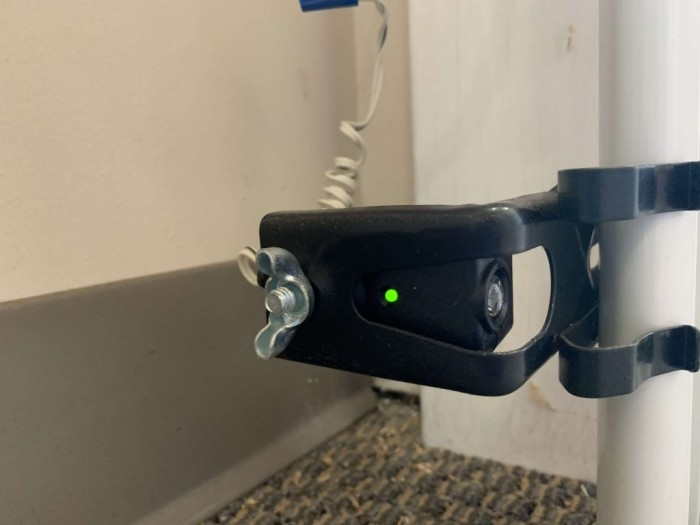
Should both garage sensors be green?
Both garage sensors should be green, as this indicates they are correctly aligned and functioning properly.
Do garage door sensors need to be aligned?
Yes, garage door sensors need to be aligned to ensure the door operates safely and reverses only when there’s an obstruction.
Where should garage door sensors be placed?
Garage door sensors should be placed six inches above the ground on each side of the door to effectively detect any obstructions.
How to fix garage door alignment?
To fix garage door alignment, inspect for obstructions, clean the sensor lenses, verify the sensors are at the same height, and adjust them until their indicator lights show proper alignment.
Conclusion
Aligning your garage door sensors is a crucial task to ensure the smooth, safe, and reliable operation of your garage door system. By following this guide, you can prevent potential accidents, avoid inconvenient malfunctions, and extend the lifespan of your garage door. However, we understand that sensor alignment can be a bit challenging, especially if you’re not familiar with garage door mechanics.
At BH Door & Gate, we’re here to take the hassle out of maintaining your garage door system. If you’re facing difficulties with alignment or any other garage door repair issues, our team of experienced professionals is ready to help. We provide top-notch service to ensure your garage door functions perfectly, giving you peace of mind and reliable performance.
Don’t let misaligned sensors disrupt your day. Contact BH Door & Gate today for expert assistance and enjoy smooth, worry-free garage door operation. Your safety and satisfaction are our top priorities. Let us handle the technicalities while you enjoy the convenience of a perfectly working garage door.
End Note
At BH Doors & Gates, we are dedicated to providing outstanding garage door services tailored to your needs. Whether you require expert installation, reliable maintenance, or prompt repairs, our team ensures your garage door functions flawlessly. Explore our comprehensive services and see the quality of our work on our homepage.
We proudly serve a variety of locations, delivering top-tier services right to your community. Check our Service Areas to see if we operate in your neighborhood. Learn more about our mission, values, and commitment to customer satisfaction on our About Us page.
Stay updated with the latest tips, trends, and insights on garage door maintenance and repair by following our blog. Don’t just take our word for it—see what our happy customers have to say on our Testimonials page.
We’re here to provide the perfect solution for your garage door needs. Don’t hesitate to reach out through our Contact Us page. At BH Doors & Gates, your satisfaction is our top priority. Contact us today and experience the difference!